How to create and deploy a Telegram bot? (Python)

You can create a basic Telegram bot in under 5 minutes. In this article we are going to create a basic telegram bot that echoes incoming text messages.
We will then add some features to it, like sending live stock market feed.
Git project - https://github.com/vandanaa-sharma/telegram_bot_stocks
Let's begin!
Step 1
Register your bot with Telegram
- Go to Telegram
- Search BotFather
- Send
/start- You will see all the available options - Send
/newbot - Enter a name for your bot. Ex. - Test Bot
- Enter a user name. Ex. - test_bot (remember the name you enter)
You will see an API_TOKEN in the final message from BotFather -
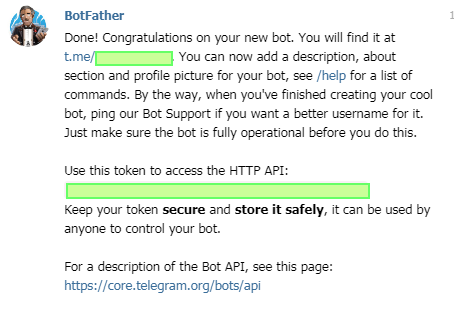
The bot is ready, voila!
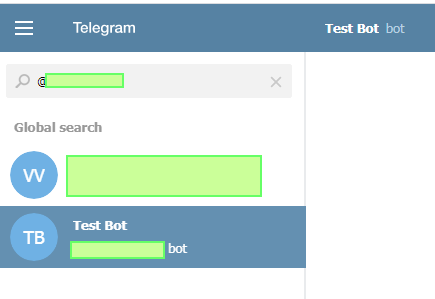
Now, look for this user name on Telegram, you can launch the bot!
Step 2
Start writing the bot
You need to install the following python packages -
pip install telegram
pip install python-telegram-bot
Create a new file main.py and add your API_TOKEN to it
from telegram.ext import Updater, CommandHandler, MessageHandler, Filters
from telegram.parsemode import ParseMode

API_TOKEN= "YOUR API KEY VALUE"
Define start, error and echo functions -
def start(update, context):
    user_name = str(update.message.chat.first_name)
    context.bot.send_message(chat_id=update.message.chat_id,
                     text="Hello <b>" + user_name + "</b>, welcome to echo bot!",
                     parse_mode = ParseMode.HTML)

def error(update, context):
    print('Update "%s" caused error "%s"', update, context.error)

def echo(update, context):
    update.message.reply_text(update.message.text)
In the above code -
- start function is sending an HTML formatted hello message to the user. You can use basic HTML tags like bold, Italics, etc.
- error function prints the error on console
- echo function echoes the message received from user
Write the main function -
if __name__ == '__main__':
    updater = Updater(API_TOKEN, use_context=True)
    dp = updater.dispatcher
Here, we have created an updater that will get us updates from telegram apis and dispatcher that will help us define what action to take on receiving updates.
Add handlers
Next, add the above functions as handlers for incoming bot commands and messages in the main function -
    dp.add_handler(CommandHandler("start", start))
    dp.add_handler(MessageHandler(Filters.text, echo))
    dp.add_error_handler(error)
Start polling in the main function
    updater.start_polling()
    updater.idle()
Step 3
Run your bot
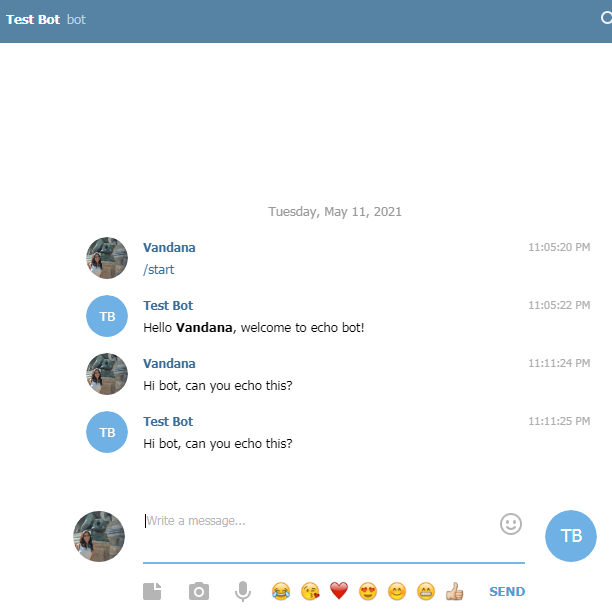
Now, run this python file - python3 main.py
You can now test the above code on your Telegram bot -
Step 4
Make your bot do more
Let us now make this bot generate options for the user to choose from. We can fetch latest stock market updates for the user.
Add the following imports to create options -
from telegram.ext import CallbackQueryHandler, CallbackContext
from telegram import InlineKeyboardButton, InlineKeyboardMarkup, Update
Now, we will write the function to send inline options to the user -
def send_options(update:Update):
    keyboard = [
        [
            InlineKeyboardButton("Mutual Funds", callback_data='mf'),
        ],
        [
            InlineKeyboardButton("Stocks", callback_data='stocks'),
        ],

    ]
    reply_markup = InlineKeyboardMarkup(keyboard)
    update.message.reply_text('Please select one of the following options:', reply_markup=reply_markup)
Call send_options in your start function
def start(update, context):
    user_name = str(update.message.chat.first_name)
    context.bot.send_message(chat_id=update.message.chat_id,
                     text="Hello <b>" + user_name + "</b>, welcome to echo bot!",
                     parse_mode = ParseMode.HTML)

    send_options(update)
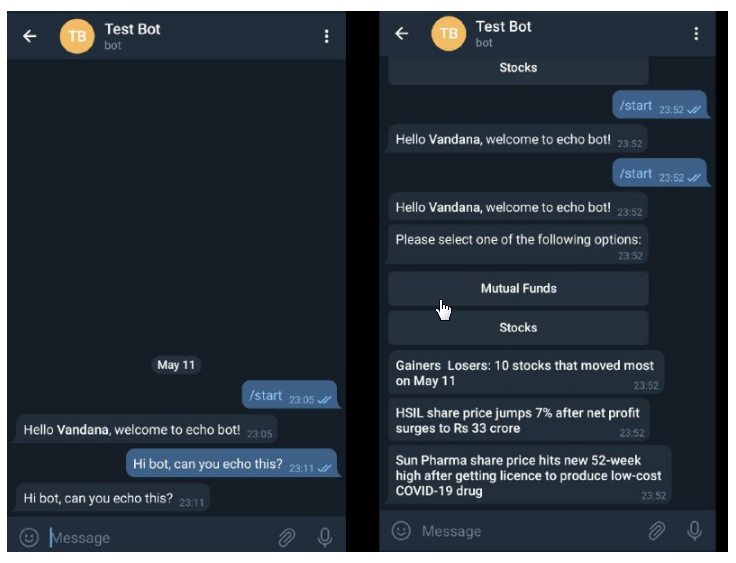
Ouput -
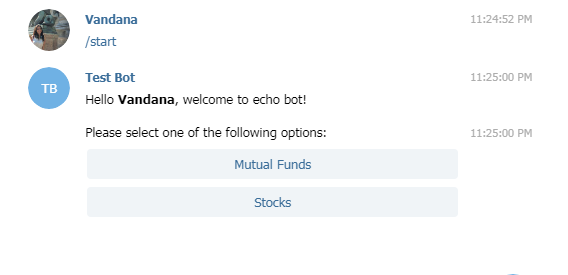
Respond to command received from user
Next, we will write what happens when the user selects one of the above options. In your main function, add callback method for selection -
dp.add_handler(CallbackQueryHandler(button))
For this example, we will fetch live stock market RSS feed from moneycontrol.com and respond to the above options.
Define the button function as -
urls = {
    "stocks" : "https://www.moneycontrol.com/rss/buzzingstocks.xml",
    "mf": "https://www.moneycontrol.com/rss/mfnews.xml"
}

def button(update: Update, context : CallbackContext):
    query = update.callback_query
    try:
        send_feed(update, context, urls[query.data])
    except:
        update.callback_query.reply_text("Oops! Something went wrong!")
        send_options(update)
        update.callback_query.answer()
We are going to use
requestslibrary to send request to moneycontrol.com- BeautifulSoup (bs4) library to parse the XML response received
pip install requests
pip install bs4
import these in main.py -
import requests
from bs4 import BeautifulSoup
Finally, let us define the send_feed function -
def send_feed(update : Update, context : CallbackContext, url):
    r = requests.get(url, verify=False)
    if r.status_code == 200 :
        soup = BeautifulSoup(r.content.decode("utf-8"), features='html.parser')
        items = soup.findAll('item')
        articles = []
        for a in items:
            title = a.find('title').text
            article = {
                'title': title,
                }
            articles.append(article)
    for i in range(3):
        if(articles[i] != None):
            message = str("<b>") + str(articles[i]['title']) + str("</b>")
            context.bot.send_message(
                            chat_id=update.effective_chat.id,
                            text=message,
                            parse_mode=ParseMode.HTML,
                    )
    update.callback_query.answer()
The above function sends top 3 headlines as response.
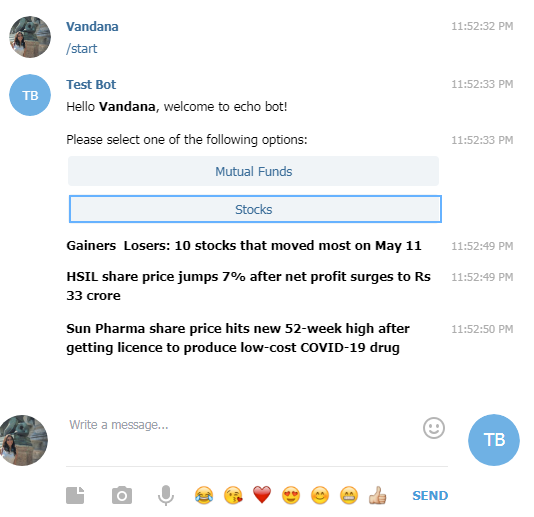
Checkout this bot I created on Telegram - stocks_buzz_bot
You can do more -
Add verification to your requests as follows -
r = requests.get(url, cert=('keys/certificate.crt', 'keys/private.key'))Generate these keys using open ssl -
openssl req -x509 -sha256 -nodes -days 365 -newkey rsa:4096 -keyout private.key -out certificate.crt- Create more options other than stocks and mutual funds
- Send more data in response like the
published dateand thedescriptionfrom the RSS feed - Fetch feed from different channels
The options are unlimited!
Step 5
Deploying on Heroku
Here is how -
- Download Heroku CLI on you system if you don't have it already
- You will find all the details here- https://devcenter.heroku.com/articles/heroku-cli
- Create you heroku account if you don't have one - https://id.heroku.com/signup/login
- Run the following command to create an heroku app in your root git (the one that contains
main.py) directory -heroku create "your_appname" - Create a
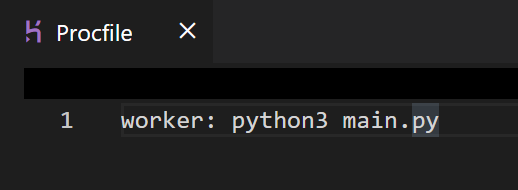
- Procfile - specifies the file to run
- requirements.txt - specifies the python dependencies in your project directory. Procfile -
To create requirements.txt run the following command in your project directory -
$ pip freeze > requirements. txt
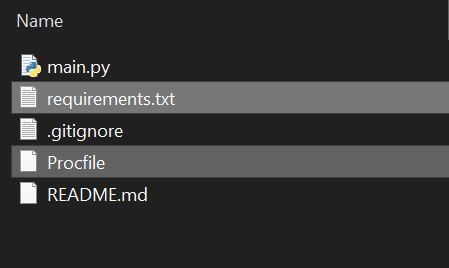
Your project directory should look something like this -
- Step 3 mentioned above, will create a new remote in your git repository named heroku
Push your code to this remote
git add . git commit -m "" git push heroku master - Run this app -
heroku ps:scale web=1 - Check the status of your app -
heroku open - Check application logs -
heroku logs --tail
References -
- https://python-telegram-bot.readthedocs.io/en/stable
- https://devcenter.heroku.com/categories/reference#deployment


